オーディオデバイスをセットアップする
Overteに初めてログインすると、お使いのコンピュータのデフォルトのオーディオデバイスが自動的に検出され、Overteに使用されます。通常、コンピュータは接続されたヘッドセットを自動的に検出するので、それ以上オーディオデバイスを設定する必要はありません。
However, some audio setups do require additional configuration. If you need to change your audio settings, read on to find out more.
Audio "At a Glance"
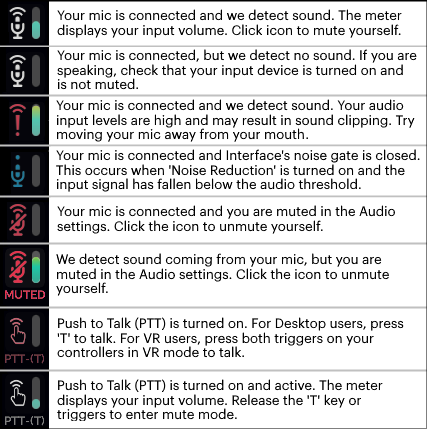
Your basic audio settings are displayed in the top-left corner of your Interface window. This is called the "Audio Level Meter" and can be turned on or off in your Audio settings (from the Tablet or HUD, click Audio).
Change your Input or Output Device
Overte's 3D spatialized audio is guaranteed to enhance your experience in cyberspace, whether you are in Desktop mode or using VR equipment. By default, we will select the default audio devices that your operating system or headset has detected. If you want to use a different headset or audio setup than the default, you can change your computer's default device. If you need to use a different device for Overte than other applications on your computer, then you can change your device in the application.
An audio input device is any device that captures sound and generates a signal that can be accessed by other devices. Examples of audio input devices include a USB microphone or a microphone headset that is plugged into your computer.
An audio output device is any device that receives information from audio files and converts it into audible sound signals. Examples of audio output devices include your desktop computer speakers, headphones, or huge speakers in a movie theater.
If you are using a headset with a microphone, then your input and output devices will likely be the same device. However, if you are using external speakers or some other open mic setup, then these devices may be different. In these cases, we encourage you to enable acoustic echo cancellation for improved audio quality.
You may also want to try using push-to-talk to completely eliminate any unwanted speaker echo and background sounds coming from your avatar when you are not talking.
To change your audio devices:
From the Tablet or HUD, click Audio.
Choose your desired input device.
Choose your desired output device.
Using Bluetooth Headsets
Overteでは、AirPodsなどのBluetoothヘッドセットを使用することができます。ただし、使用には制限があり、すべての環境で使用できない場合がありますので、ご注意ください。WiFiを使用する場合、5GhzのWiFi接続を使用していることを確認してください。2.4Ghzの接続では、音声が途切れたり、時々切断されることがあります。
Unfortunately, bluetooth audio devices typically do not support stereo audio at the same time as microphone input. Therefore, you have two options:
Use the bluetooth headset as an output device only, and use another microphone for input. This allows you to take advantage of the stereo audio at a high quality.
Use the bluetooth headset's built-in microphone. In this case, you may only experience mono sound at a reduced quality, rather than Overte's stereo audio.
Acoustic Echo Cancellation
音響エコーとは、スピーカーからの音がマイクに拾われ、伝達され、結果としてエコー効果が発生することです。これは、Overteを取り外し可能なヘッドセットではなく、ラップトップの内蔵マイクとスピーカー(つまり「オープンマイク」)で使用した場合によく起こります。
"Acoustic echo cancellation" is a technology which improves voice quality by preventing the echo that results in open mic setups. By default, acoustic echo cancellation is turned on, and you can turn it off in the Audio app.
注釈
Acoustic echo cancellation will not run when using input devices with high sample rates (greater than 96khz) or more than 2 channels.
For best performance with open mic setups, ensure that you:
Disable any processing and effects on the input and output devices. This includes:
On Windows: Turn off all 'Enhancements'; see Microsoft support article for instructions.
Lower the microphone's physical gain setting to approximately 3/4 of the maximum
Lower the speaker's physical volume level to approximately 3/4 of the maximum
If you are not using your laptop's audio devices, move and point the microphone away from the speakers
The acoustic echo cancellation technology picks up the sounds around you and attempts to identify the echoing sounds as you use it. This means that it will improve and become more accurate over time. So don't despair if you hear a little bit of echoing...it will lessen as the technology learns your voice and the voices of the people around you!
To speed up this "learning" process, you can:
Avoid turning your avatar while talking
Leave your microphone muted while another person talks for 10 seconds at a time
Test Your Audio Devices
Audio is an integral part of social VR experience, so of course, we want to make sure that your devices are working correctly and that everyone can hear you! There's nothing more annoying than walking up to a group of friends in a virtual world, only to realize that they haven't heard a word you said! The good news is that you can test your audio setup to make sure that both your input and output devices are working correctly.
注釈
The 'Test Your Voice' feature requires you to be unmuted! We recommend heading back to the Tutorial place prior to checking your voice input if you do not want others to hear your microphone check.
From the Tablet or HUD, click Audio.
Click 'Test Your Voice' to test your input device. Speak into your mic, and the sound will be played right back at you through the selected output device. Make any adjustments to your input device to achieve your desired sound.
Click 'Test Your Sound' to test your output device. Adjust the headset and/or application volume until the sound is a comfortable volume.
Adjust In-World Volume
There are three different types of “sounds” in Overte:
People: The sound you hear when people in the domain are talking through their microphones
Environment: The ambient sounds in the domain, running as scripts in the background
System Sound: The sound your computer makes as you interact with the application window (such as the “clicking” you hear when you hover over an icon)
To change the volume of all of these at once, simply change the volume of your headset or output device.
To change one or more of these sound types independently of the others:
From the Tablet or HUD, click Audio.
Choose 'Desktop' or 'VR' depending on the mode you are in.
Adjust the sliders to the desired volume levels for each of the sound types.
Enable Push to Talk (PTT)
‘Push to Talk’ is like having a walkie talkie in your hand. You need to press a button to have others hear you in the environment. When you’re not pressing the button, you are muted and will not be heard.
To turn on ‘Push to Talk’:
From the Tablet or HUD, click Audio.
Choose 'Desktop' or 'VR' depending on the mode you are in.
Toggle 'Push to Talk' on.
In Desktop mode, press and hold the “T” key on your keyboard to talk. When using an HMD in VR mode, press and hold the grip triggers on your controllers to talk. This feature works only when you are focused on the Interface window.
Adjust Overte Audio Settings
There are a number of settings you can configure to customize your audio experience in Overte. To change these, open your Tablet or HUD and go to Audio.
Setting |
Description |
|---|---|
Mute microphone |
Mute or unmute your microphone. |
HMD Mute Warning (VR) |
Enable to receive a warning when your microphone is muted when wearing a HMD device. |
Push To Talk |
Enable or disable push to talk. |
Audio level meter |
By default, the audio level meter is visible on the top left corner of your screen. Uncheck this box to hide the meter. |
Stereo input |
Enable or disable stereo input. Stereo reproduces sound using two or more audio channels. This means that you will hear sound from various directions, like how you would in the real world. |
Echo Cancellation |
Enable or disable acoustic echo cancellation. |
Noise reduction |
Enable to turn on noise reduction. This removes outside noise from audio signals. |
Manual Noise Reduction |
Enable to allow setting a custom threshold for noise reduction. |
Adjust OS Audio Settings
Many device settings, such as input levels, boost, gains, and enhancements, cannot be set in Overte. These settings can only be adjusted at the operating system level or with a device's external software. If you experience issues with audio that cannot be resolved with any of the above settings, then try adjusting your operating system's device settings:
Update the driver software for your audio devices:
On Windows: Follow steps in Microsoft support article Update drivers through Device Manager in Windows
Adjust microphone levels and/or boost:
On Windows: Follow the steps under "To test a microphone that's already installed" of Microsoft support article How to set up and test microphones in Windows