Configurar un Nombre de Lugar
Si bien puedes viajar a un dominio usando su dirección IP, las direcciones IP son difíciles de recordar, a menudo cambian según la configuración de tu red y no suenan muy atractivas. Decirle a un amigo "Nos vemos en 20 minutos en la dirección IP..." simplemente no funciona en un entorno virtual divertido.
Los Place names (Nombres de lugares), por otro lado, facilitan viajar a tu dominio. Son memorables y brindan contexto a los visitantes para que recuerden tu mundo virtual. Imagina a alguien diciendo "¡Guau, la pasé muy bien en Deerhaven anoche!" y puedes sonreír sabiendo que están hablando de tu dominio, Deerhaven.
Conseguir un Place Name
Una vez adquirido, un place name puede transferirse libremente entre cualquiera de tus dominios.
Ve a https://mv.overte.org/dashboard/places para obtener un nombre de lugar. Si no has iniciado sesión, se te pedirá que lo hagas.
Haz click en "Create Place".
Escribe tu nuevo Place Name. Puedes usar cualquier Place Name que aún no se haya tomado; sin embargo, ten en cuenta que Overte se reserva el derecho de rechazar cualquier registro que consideremos obsceno, ofensivo o una violación de los derechos de autor.
Haz click en "Create".
Configura Tu Place Name
Un place name apunta a una coordenada específica en el metaverso. No solo apunta a un dominio, sino que también define la posición exacta en tu dominio donde se generarán tus visitantes. Hay dos formas diferentes de configurar los ajustes del place name, y logran lo mismo.
Método 1 - Usando la Configuración del Dominio
Esto configura tu place name directamente desde la configuración de tu dominio.
Abre la configuración de tu dominio.
Para dominios alojados en la nube: abre un navegador e ingresa la URL http://<inserta la dirección IP de tu servidor aquí>:40100/settings. Inicia sesión cuando se te solicite.
Para servidores locales en Windows: Haz click en el ícono de Overte en la bandeja del sistema, luego haz click en "Settings".
Para servidores locales en Mac: haz click derecho en el ícono de Overte en la barra de menú superior, luego haz click en "Settings".
Para cualquier Sistema Operativo: Abre un navegador e ingresa la URL: http://localhost:40100/settings.
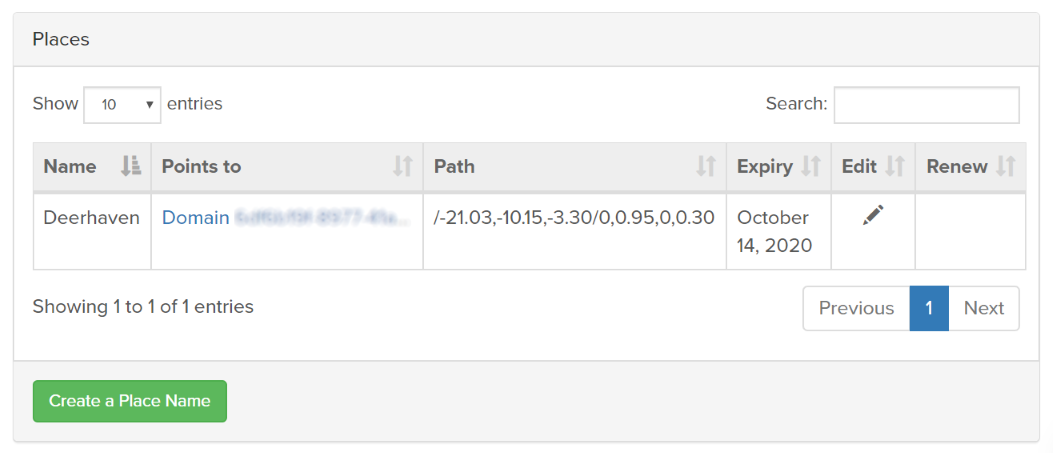
Desplázate hasta "Places".
En la cuadrícula, haz clic en el icono
+para agregar un place name a este dominio.Elije el place name que quieras usar de la lista desplegable.
Para "Path o Viewpoint", ingresa las coordenadas donde aparecerán tus visitantes.
Haz click en "Save".
Método 2 - Usando "My Places"
Esto configura el place name desde tu cuenta de Overte. Antes de continuar, asegúrate de tener el domain ID de tu dominio. Necesitarás esto para apuntar tu place name a tu dominio.
Ve a https://mv.overte.org/dashboard/places. Si no has iniciado sesión, se te pedirá que lo hagas.
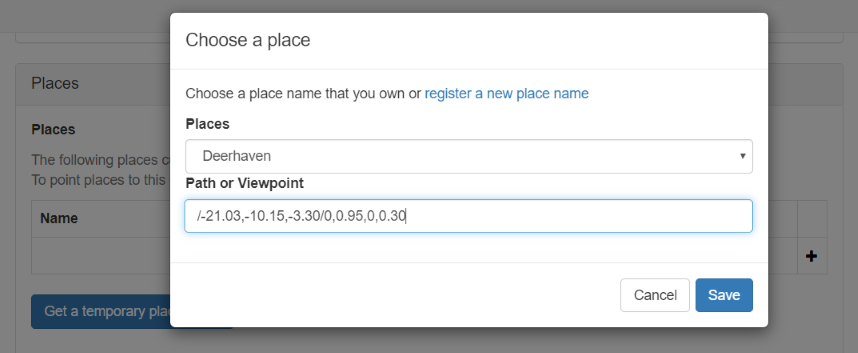
Haz click en el ícono "Edit" junto al place name que quieres configurar.
Para "Points to", ingresa el ID de dominio de tu dominio.
Para "Path", ingresa las coordenadas donde aparecerán tus visitantes.
(Optional) Enter a description for your domain. This shows up when a user clicks the info icon if your domain is displayed in the Places app.
(Optional) Upload a preview image of your domain. This shows up when your domain is displayed in the Places app.
Haz click en "Update Place".