Asignar Permisos de Usuario
Puedes proteger tu dominio configurando los permisos de usuario para los visitantes de tu dominio. En la configuración de tu dominio, tú controlas los tipos de usuarios que tienen acceso a tu dominio y los permisos que se les otorgan. Por ejemplo, puedes permitir que cualquier persona se conecte a tu dominio, pero solo dar acceso a amigos para editar el contenido de tu dominio.
Asignar Permisos de Usuario
Los permisos se pueden asignar a grupos de usuarios estándar, grupos de usuarios personalizados, usuarios específicos, usuarios de una IP específica y usuarios de computadoras específicas.
Los permisos para un usuario serán la suma de todos los grupos en los que se encuentra el usuario. Por ejemplo, supongamos que todos los usuarios registrados pueden conectarse y solo los usuarios de host local pueden activar entidades. Si un usuario ha iniciado sesión y está en localhost, entonces podrá conectarse y rez (activar) entidades. Además, cuando se asignan permisos de usuario a un usuario específico, reemplazará a cualquier permiso a nivel de grupo que de otro modo podría aplicarse a ese usuario.
Para asignar permisos de usuario:
Abre la configuración de tu dominio.
Para dominios alojados en la nube: abre un navegador e ingresa la URL http://<inserta la dirección IP de tu servidor aquí>:40100/settings. Inicia sesión cuando se te solicite.
Para servidores locales en Windows: Haz click en el ícono de Overte en la bandeja del sistema, luego haz click en "Settings".
Para servidores locales en Mac: haz click derecho en el ícono de Overte en la barra de menú superior, luego haz click en "Settings".
Para cualquier Sistema Operativo: Abre un navegador e ingresa la URL: http://localhost:40100/settings.
Desplázate hasta "Domain-Wide User Permissions".
Primero, configura los permisos para los grupos de usuarios estándar. Marca la casilla de todos los permisos que quieras otorgar.
Para asignar todos los demás permisos, debes agregar un grupo personalizado, un usuario específico, etc. individualmente a la tabla de permisos correcta:
Añadir Grupo: Ingresa el nombre del grupo o lista personalizada, luego haz click en el ícono
+. Guarda la configuración de tu dominio para cargar rangos. Marca la casilla de todos los permisos que te gustaría otorgar o denegar (dependiendo de la tabla de permisos a la que estés agregando el grupo).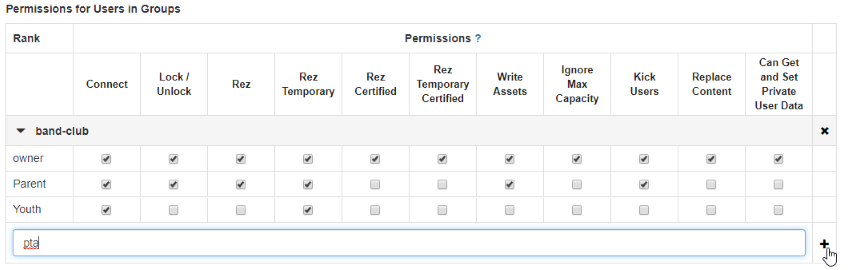
Añadir un Usuario Específico: Haz click en el ícono
+, luego ingresa un nombre de usuario específico. Marca la casilla de todos los permisos que te gustaría otorgar.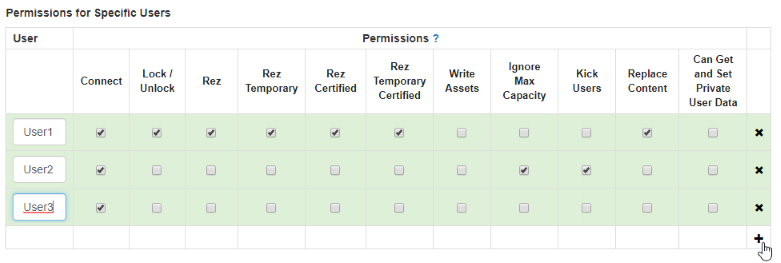
Añadir una Dirección IP, una Dirección MAC o Huella dactilar de la Máquina: Haz click en el ícono
+, luego ingresa la información (según la tabla de permisos a la que estés agregando permisos). Marca la casilla de todos los permisos que te gustaría otorgar.
Haz clic en "Save" para guardar la configuración de tu dominio.
Grupos de Usuarios Estándar
Tu dominio viene con cuatro grupos de seguridad básicos que ya están configurados, en función de las personas con las que interactuarás en el metaverso. Ellos son:
Tipo de usuario |
Descripción |
|---|---|
anonymous |
Una persona que no ha iniciado sesión y está utilizando una instancia de la interfaz de Overte. Este es el tipo de usuario predeterminado para alguien que ha descargado la Interface por primera vez. |
friends |
Un usuario con el que te hayas conectado estrechando la mano de su avatar y haciendo click en la casilla de verificación "Friends" en tu aplicación People. Las conexiones son diferentes de los amigos. Por defecto, los Amigos (friends) tienen más permisos en tus dominios que tus Conexiones (Connections). Las conexiones se tratan como usuarios anónimos. |
localhost |
Un usuario que está ejecutando la Interface en la misma máquina donde está alojado el servidor. Los usuarios de localhost no necesitan iniciar sesión y tener permisos que anulen los permisos no específicos del usuario. |
logged-in |
Un usuario que ha iniciado sesión en su cuenta de Overte mientras usa la Interface. No necesitan ser un Amigo (Friend) o una Conexión (Connection) para tener derechos de servidor. Los permisos que se otorgan a un usuario específico anulan todos los demás permisos. |
El permiso "Connect" para esos grupos de usuarios estándar determina el nivel de privacidad de tu dominio:
Public: A public domain allows 'anonymous' and/or 'logged-in' users to connect to it. These domains may be shown in the Places app and in other places around the metaverse.
Private: Un dominio privado no permite que los usuarios "anónimos" y/o "registrados" se conecten a él. Los propietarios de dominios son responsables de promocionar sus dominios a otros usuarios y mantener los permisos de conexión para que los usuarios ingresen a su dominio.
Permisos de Usuario
Las acciones que puedes otorgar para cada tipo de usuario son las siguientes:
Permisos |
Definición |
|---|---|
Connect |
Establece si un usuario puede ingresar al dominio. |
Lock/Unlock |
Establece si un usuario puede cambiar la propiedad "locked" (bloqueado) de una entidad para evitar que se modifique. |
Rez |
Establece si un usuario puede crear (o invocar) permanentemente nuevas entidades en el dominio. Estos usuarios también tendrán acceso completo a la aplicación Crear. |
Rez Temporary |
Establece si un usuario puede crear (o invocar) nuevas entidades con un tiempo de vida finito (el tiempo de vida se establece en Domain Settings > Entities > Advanced Settings > Maximum Lifetime of Temporary Entities). Estos usuarios también tendrán acceso completo a la aplicación Crear. |
Write Assets |
Establece si un usuario puede agregar activos (modelos, audio u otros archivos) o realizar cambios en el servidor de activos del dominio (el espacio de almacenamiento de archivos de tu dominio). |
Ignore Max Capacity |
Establece si un usuario puede ingresar a un dominio incluso si ha alcanzado o excedido el límite de capacidad especificado. |
Kick Users |
Establece si un usuario puede banear a otros usuarios de un dominio. |
Replace Content |
Establece si un usuario puede cambiar todo el conjunto de contenido de un dominio borrando el contenido existente. |
Can Get and Set Private User Data |
Establece si un usuario puede acceder y escribir en la propiedad "Private User Data" de las entidades en el dominio. Los datos de usuario privados (Private User Data) son una propiedad de las entidades que solo se pueden establecer y recuperar a través de scripts por medio de la propiedad |
Puede ver las URLs de los recursos |
Sets whether a user can view asset URLs in Create and scripts. If a user doesn't have this permission, the URLs will be reported as empty strings. Note: this is only a client-side protection. Learn more about asset security. |