Find and Use an Existing Avatar
You can download avatars for use from external sources such as TurboSquid or CGTrader. Once you get the avatar, you will need to process it in Unity using the Overte Avatar Exporter. This tool imports most avatars into Unity, maps their skeleton using Unity's humanoid tool, and exports them as FST and GLB/FBX files to import in-world. Learn more about the security of your assets.
Avatar Guidelines
Many external sites like TurboSquid and CGTrader provide avatars that you can use. However, note that not all of the avatars you find may work in Overte. To improve the chances that your downloaded avatar is compatible with Overte, we've compiled a list of guidelines to help you "sanity check" it prior to use.
You should ensure that:
You downloaded a real-time model (rigged for run-time, not rigged for render).
You have the correct downloaded files
An glTF/GLB/FBX model for your avatar. We do not support other 3D model formats. GLB/glTF is recommended over FBX due to better PBR material support.
(Optional) One or more image files to give your avatar color and texture. Sometimes, these are already embedded in your GLB/FBX model and you won't have any additional image files in your download.
Your avatar is rigged.
Bemerkung
If your avatar is not rigged, you can use Blender or Mixamo to rig it. If you use Mixamo, you do not necessarily need to use Unity and the avatar exporter. Because Mixamo already uses a skeleton that we support, you can load the GLB/FBX file directly, create FST file by hand or use our Avatar Packager to import your avatar into Overte. Avatar Packager needs maintenance so it's not recommended currently.
Overte Avatar Exporter for Unity
Overte supports only one standard type of rigging for avatars. Because many avatars do not match this skeleton, we created the Overte Avatar Exporter for Unity (also known as the "avatar exporter") to convert human-like avatars with a humanoid bone structure (body, head, and limbs). The avatar exporter also automatically packages your avatar for use in Overte.
Bemerkung
The avatar exporter was written to improve the process of rigging and mapping the skeleton rig. This will not affect the animations or materials in your avatar. To adjust the materials, you will need to use a 3D modeling tool such as Blender or Maya and make modifications to your avatar prior to using the avatar exporter in Unity.
You will need the following to use this tool:
Unity (Recommended versions: 2022.3.22f1)
Overte
Please note that the recommended version of Unity is not the latest version.
We recommend that you apply a T-Pose to your avatar. To do so, go to the 'Inspector', and click 'Pose' near the bottom of the panel. Select 'Enforce T-Pose' from the drop-down. Click 'Apply' and 'Done'. We recommend doing this after correcting any issues with remapping bones.
Install the Avatar Exporter
You need to install the extension for every Unity project that you have.
To install the exporter follow the directions in Unity Avatar Exporter's README file.
Create an Avatar Package
Warnung
FIXME: This part is outdated. Newest exporter saves GLB files together with FST.
If you don't already have your model open in Unity, you need to import your model. Use any of the following methods:
Drag and drop the FBX file into the 'Assets' folder of your 'Project' window.
In the 'Project' window, right-click the 'Assets' folder, then select Import Package > Import New Asset. Navigate to the FBX file and click 'Import'.
In Unity, open the 'Assets' menu, then select Import Package > Import New Asset. Navigate to the FBX file and click 'Import'.
In the 'Project' window, select your avatar’s FBX file. In the 'Inspector', open 'Rig'. For 'Animation Type', choose 'Humanoid' and then click 'Apply'.
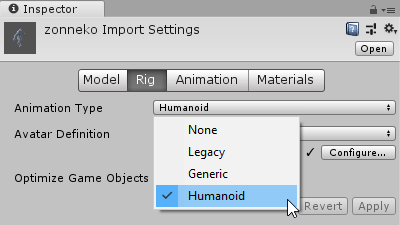
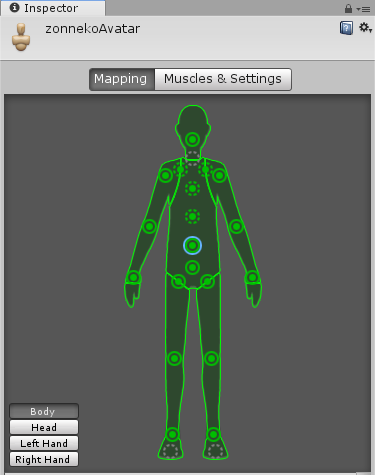
Click 'Configure' to investigate and tweak the mapping of your avatar.
All bones mapped in Unity are highlighted in green and can be selected. Check if anything is missing. Any errors will appear in red. The minimum required bones for mapping are Hips, Spine, Chest, and Head. If either of these are missing, you must manually add bones before continuing. You can do this by dragging the bones from the 'Avatar Configuration' panel to the 'Inspector' panel.
Bemerkung
Avatars in Overte must have a Chest bone. If your avatar does not have a chest bone, the avatar exporter may suggest a suitable alternative from the 'Avatar Configuration' panel. If the exporter doesn't suggest an alternative and Humanoid doesn't correctly map the Chest, then you will get an error and need to manually map a bone to the Chest from 'Avatar Configuration'.
If you made any changes, click 'Done'.
Click on the FBX file in the 'Assets' manager.
Make sure that you have the avatar exporter installed. Open the 'Overte' menu in the top menu bar, then select 'Export New Avatar'.
Give your avatar project a name. The default project location is your local user's
Documents\Overte Projectsdirectory, which is created automatically for you. Though we recommend that you keep your avatars in this directory, you can change it to another location on your computer.
Click 'Export'.
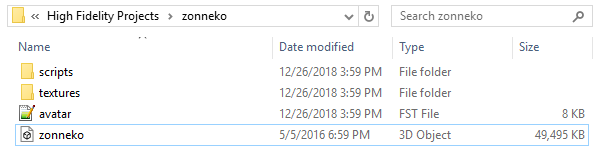
Your avatar package has been created! The File Explorer will open to your new avatar project.
Bemerkung
If you are using any external textures with your avatar model, copy those textures to your local user's Documents\Overte Projects\avatar\<project name>\textures directory. Otherwise, they may not show up on your avatar.
Test Your Avatar
We encourage you to "spot check" your avatar in Unity before exporting it with the Overte Avatar Exporter for Unity. Check for the following:
Confirm that there are no extraneous objects attached to your model. For example, this Mech avatar has a ground blue object included in the model. All extraneous objects will be imported into Overte and may affect the rendering or animation of your avatar.
Test your bone movements. In Unity's 'Inspector', open 'Rig'. For 'Animation Type', choose 'Humanoid' and then click 'Apply'. Go to 'Muscles & Settings' to test your avatar's bone configuration and ensure that it works as expected.
If everything looks good, you need to host your avatar then change your avatar to wear it.
Troubleshooting Tips
Many of the errors you will encounter describe issues with the avatar’s skeleton. These are fully documented here: Troubleshooting with the Avatar Packager. Here are some other issues you may encounter after using a downloaded avatar and using the avatar exporter:
Issue |
Troubleshooting Tip |
|---|---|
You receive a warning in Unity: "Character is not in T pose." |
Go to the 'Inspector', click 'Configure', and then select 'Pose' near the bottom of the panel. Select 'Enforce T-Pose' from the drop-down. Click 'Apply' and 'Done'. We recommend doing this after correcting any issues with remapping bones. |
In Unity, your avatar is a solid color. |
This suggests that the materials or shaders you are using are not supported.
|
Your avatar is gray. |
One of the following issues could have occurred:
|
Your avatar is tied up into knots or laying down. |
This could mean that your skeleton is not right. Re-open your avatar in Unity and run through steps 2-5 of Create an Avatar Package again. Update your project in Unity (go to Update Existing Avatar, then browse to your avatar package). If it still doesn't work, ensure that you are testing the correct file that the avatar exporter created. |
Your avatar's skin doesn't move properly with animations. |
The avatar exporter was written to improve the process of rigging and mapping the skeleton rig. This will not affect the animations in your avatar. To adjust the animations, you will need to use a 3D modeling tool such as Blender or Maya and fix the skin weighting on the avatar prior to using the avatar exporter in Unity. |
Siehe auch